- Match report
- Match report
- Line-up
Follow @soccerdonna
![]() Soccerdonna-News auf Twitter
Soccerdonna-News auf Twitter
0:3
(0:1)
-
A-League Women - 9. Match day - 28.01.2022 - 09:45
Marconi Stadium - 515 Spectators - Referee: Isabella Blaess, 25 years


 0:3
0:3

|
 1:2
1:2

|
 3:3
3:3

|
 3:2
3:2

|
 2:2
2:2

|
Formation
| Line-up: Western Sydney Wanderers | ||
|---|---|---|
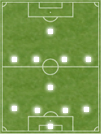 4-1-4-1:
Sarah Langman - Teigen Allen, Alexia Apostolakis, Caitlin Cooper, Clare Hunt - Libby Copus-Brown, Rosie Galea, Bianca Galić - Sheridan Gallagher, Erica Halloway, Bryleeh Henry Coach: Catherine Cannuli |
||
| ø-Age starting11: 24.1 years ø-MV starting11: 6.364 € | ||
| Line-up: Adelaide United | ||
|---|---|---|
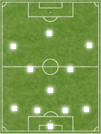 4-3-3 offensively-minded:
Annalee Grove - Paige Hayward, Emily Hodgson, Isabel Hodgson, Matilda McNamara, Kayla Sharples - Emily Condon, Dylan Holmes, Nanako Sasaki - Chelsie Dawber, Fiona Worts Coach: Adrian Stenta |
||
| ø-Age starting11: 23.3 years ø-MV starting11: 7.273 € | ||
Goals
| Western Sydney Wanderers | ||
|---|---|---|
| none |
| Adelaide United | ||
|---|---|---|
| 0:1 |
Sharples 5. min. Right-foot shot, 1. Saisontor Assist: Dawber, Header ball, 1. Vorlage |
|
| 0:2 |
Dawber 55. min. Right-foot shot, 5. Saisontor Assist: Worts, Pass, 2. Vorlage |
|
| 0:3 |
Dawber 87. min. Right-foot shot, 6. Saisontor Assist: Omiya, Pass, 2. Vorlage |
|
Substitutions
| Western Sydney Wanderers | |||
|---|---|---|---|
|
Defence, 34. min. Injury |
Huynh Defence |
||
|
Striker, 67. min. Tactic |
Collister Striker |
||
|
Midfield, 74. min. Tactic |
Steinmetz Midfield |
||
|
Defence, 74. min. Tactic |
Matos Defence |
||
| Adelaide United | |||
|---|---|---|---|
|
Midfield, 77. min. Injury |
Omiya Midfield |
||
|
Striker, 89. min. Tactic |
Murray Striker |
||
|
Defence, 89. min. Tactic |
Beaumont Striker |
||
|
Midfield, 90. + 1 min. Tactic |
Varley Defence |
||
Cards: none
| Western Sydney Wanderers | ||
|---|---|---|
| none |
| Adelaide United | ||
|---|---|---|
| none |