- Spielbericht
- Spielbericht
- Aufstellung
Follow @soccerdonna
![]() Soccerdonna-News auf Twitter
Soccerdonna-News auf Twitter
2:3
(1:1)
-
A-League Women - 12. Spieltag - 19.01.2025 - 08:00 Uhr
Perry Park - 3.712 ZuschauerInnen - SchiedsrichterIn: Page Malau-Aduli


 1:1
1:1

|
 1:0
1:0

|
 1:0
1:0

|
 3:2
3:2

|
 0:0
0:0

|
 2:3
2:3

|
Weitere SchiedsrichterInnen
SchiedsrichterassistentIn 1: Avrol Beecham
SchiedsrichterassistentIn 2: Mi-suk Park
VierteR OffizielleR: Joey Lee
Taktische Ausrichtung
| Startaufstellung: Brisbane Roar | ||
|---|---|---|
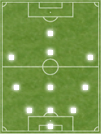 3-3-3-1:
Olivia Sekany - Chelsea Blissett, Deborah-Anne de la Harpe, Momo Hayashi, Holly McQueen, Leia Varley - Laini Freier, Alicia Woods, Tameka Yallop - Sharn Freier, Evdokia Popadinova TrainerIn: Alex Smith |
||
| ø-Alter Startelf: 25 Jahre ø-MW Startelf: 7.273 € | ||
| Startaufstellung: Adelaide United | ||
|---|---|---|
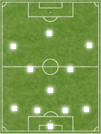 4-3-3 offensiv:
Claudia Jenkins - Emily Hodgson, Lucía León, Matilda McNamara, Zoe Tolland, Ella Tonkin - Emily Condon, Sarah Morgan, Nanako Sasaki - Chelsie Dawber, Erin Healy TrainerIn: Adrian Stenta |
||
| ø-Alter Startelf: 24.5 Jahre ø-MW Startelf: 1.818 € | ||
Tore
| Brisbane Roar | ||
|---|---|---|
| 1:1 |
Woods 45. Min. Linksschuss, 1. Saisontor - |
|
| 2:3 |
Yallop 90. + 3 Min. Kopfball, 6. Saisontor Vorarbeit: Hecher, Flanke, 1. Vorlage |
|
| Adelaide United | ||
|---|---|---|
| 0:1 |
Dawber 42. Min. Rechtsschuss, 3. Saisontor Vorarbeit: Condon, Pass, 2. Vorlage |
|
| 1:2 |
Healy 47. Min. Rechtsschuss, 2. Saisontor Vorarbeit: Hodgson, Pass, 2. Vorlage |
|
| 1:3 |
Dawber 71. Min. Kopfball, 4. Saisontor Vorarbeit: McNamara, Kopfball, 1. Vorlage |
|
Wechsel
| Brisbane Roar | |||
|---|---|---|---|
|
Abwehr, 46. Min. Taktik |
Kruger Mittelfeld |
||
|
Angriff, 55. Min. Taktik |
Kuilamu Angriff |
||
|
Abwehr, 64. Min. Taktik |
Pringle Abwehr |
||
|
Mittelfeld, 80. Min. Taktik |
Hecher Mittelfeld |
||
| Adelaide United | |||
|---|---|---|---|
|
Mittelfeld, 46. Min. Taktik |
Dewey Mittelfeld |
||
|
Mittelfeld, 70. Min. Taktik |
Karambasis Mittelfeld |
||
|
Abwehr, 80. Min. |
Bowler Angriff |
||
|
Mittelfeld, 85. Min. Taktik |
Panagaris Angriff |
||
Karten
| Brisbane Roar | ||
|---|---|---|
 |
Popadinova
13. Min., 2. gelbe Karte, Foul |
|
| Adelaide United | ||
|---|---|---|
|
Sasaki
45. + 3 Min., 1. gelbe Karte, Foul |
|